Creating a Character Prefab (Entity)
What is an Entity?
An entity is anything that can attack, take damage, has stats or otherwise. It’s your basic character.
Step 1: Open the “Game” Scene
Open up the Game scene inside RPGBattleSystem/Source/Scenes/Game.unity
Step 2: Creating the Character Prefab
Let's start out with the visuals of the character since that’s WAY more fun!
-
Drag out the Template Prefab from: RPGBattleSystem/Source/Prefabs/TemplateCharacter.prefab
-
Rename the prefab and save it by dragging it into a folder! This way we don’t override our template :)
-
Now that we have our own Character out, unfold it and select the Animator child.
-
Rename this Object to whatever you want the Runtime Animator component to be called.
-
Open the Animation window by going to the menu item Window/Animation
-
You’ll see a Create button in the window, click it!
Step 3: Character Animations
Animations are key to the RPG Battle System, we will use the Animations for visually showing what’s happening as well as the Animation Event System to tell our scripts when to show different things.
Idle Animation
The idle animation MUST be named Idle.
Attack Animation
Multiple attack animations can exist on the same character as you’ll reference them directly when assigning attacks, more about this later. You can name the attack animations whatever you want, I usually just do Attack1, Attack2, Attack3 etc.. for easy reference later.
The attackCallback is used for timing purposes, the attack will fire in the exact frame that the attackCallback is executed.
To place an attackCallback event in your animation follow instructions below:
-
Once you have your attack animation the way you like it within the animation window look for the spot where you want the effect and the target of the attack to be “damaged”.
-
The spot in the animator for the Warrior looks great to me, make sure your timeline is AT THE SPOT YOU WANT THE ANIMATION EVENT TO FIRE then click on the animation event button.
-
In the inspector you should see “Animation Event” with a dropdown. Click the dropdown and select “attackCallback”.


Damaged Animation
MUST be named Damaged.
Death Animation
MUST be named Death.
Step 4: Configure the Animator
-
Open up the Animator Window in Window/Animator
-
Make all your animations transition back to your Idle animation.

You’re all done with the visual prefab of the Character for now! Let’s get the data side of things squared away.
Step 5: Creating EntityData
To create your own EntityData object Right-Click anywhere in your project and select Entity Data.
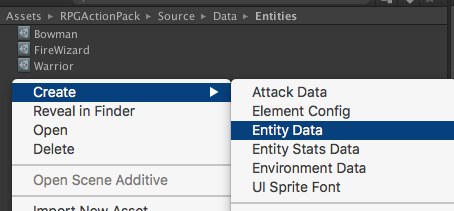
This should create a new Scriptable Object, name the object whatever you want and select it to see the properties in the Inspector Window.
-
Name: The display name of this entity.
-
Description: The description of this entity.
-
Portrait: The image used to show off the entity.
-
Element: What element this entity is.
-
These are default elements but these can easily be changed
-
-
Stats: A stats object housing various stats for the character.
-
Prefab: The entities visual prefab. (Place the visual you just created here!!)
-
Attacks: A list of EntityAttackData.
-
Animation: A string name of the animation this attack should play.
-
AttackData: The attack data associated with this attack.
Step 6: Creating Attacks
What’s an RPG without attacks? Amiright? AttackData is as simple as creating EntityData. Just Right-Click and select “Attack Data”.

This should create a new Scriptable Object, name the object whatever you want and select it to see the properties in the Inspector Window.
-
Name: The display name of this attack.
-
Description: The description of this attack, this has special formatting options.
Type “{“ and “}” around a variable name to have it’s value shown instead of the word. Example: If the attack had 50 power typing “This attack does {power} damage!” would result in the description showing “This attack does 50 damage!”.
-
Portrait: The image used to show off the attack.
-
Cost: The mana cost of the attack.
-
Element: What element this entity is. > (NOTE: I created default elements but these can easily be changed)
-
Prefab: The attacks visual prefab.
-
Attack Type: The Attack Type of the attack, this is the most crucial part of the attack, and the attacks behaviour will change depending on the type you choose.
-
Melee: An attack that visually shows the character move to the target when used. Examples: Sword attacks, Spear attacks, Punches etc.
-
Ranged: An attack that will not change the character’s position when used, usually used with the Projectile Move Type. Examples: Bow attacks, Fireballs, Magic attacks.
-
Move Type: This is how the attack moves inside the game.
-
Spawn On Target: The prefab will just spawn on the target.
-
Projectile: The prefab will spawn on a specific spawn point and move to the target at Move Speed.
-
Hit Target: The hit target allows the user to change who gets hit by the attack.
-
Single: A single target, the user will have to select the target by pressing it.
-
Self: The attack is used on the caster.
-
Random All: Randomly attacks both the friendly entities and the enemy entities.
-
Random Enemies: Randomly attacks enemy entities.
-
Random Friendly: Randomly attacks friendly entities.
-
-
Power: How much damage the attack will do (also used for increasing/decreasing for stat modifier type attacks).
-
Count: How many attacks is fired. (Multi-fired attacks)
-
Delay Between Attacks: (Shown only if count is greater than 1) Used as a small delay between attacks.
-
Move Speed: (Shown only for Projectile Move types) How fast does the projectile move.
Step 7: Adding attack data to your Character
-
Drag your attack data object you just created or grab one from @RPGBattleSystem/Source/Data/Attacks into your created EntityData’s Attack List
-
Give it an animation that you just created and want to use.

Step 8: Adding your character to the game
-
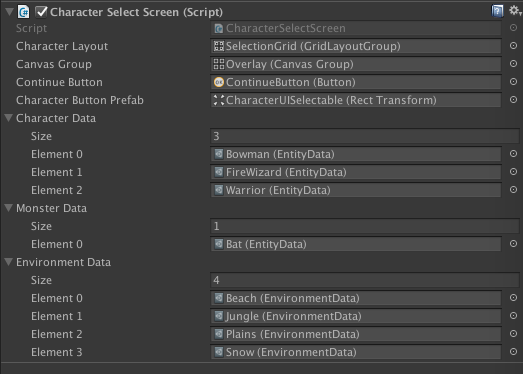
Once you have your entity data all set up like the picture above ^ you’ll want to add this object to the game.
-
Look for ViewController inside the Game Scene and open up it’s children.
-
Select the CharacterSelectScreen Object and set it active.
-
You should see CharacterData, MonsterData and EnvironmentData. If your character you made is a playable character you’ll want to drag the data object inside here, otherwise you’ll want to drag it into the monster data.
-
Make sure you APPLY your CharacterSelectScreen gameobject prefab and set it inactive.

Step 9: Clean up the Game Scene
-
After this tutorial you may still have the Character you created object still in the scene. You can safely delete it or set it in active.
-
Hit play to see your character in game!
-
If something goes wrong please email me tomtominc1@gmail.com